How to Use Pinterest for Blogging in 2025 | 9 Steps to Drive Fast Traffic
Updated On

To use Pinterest for blogging:
- Create a Pinterest business account
- Make your first boards
- Design your blog pins and upload them
- Add relevant keywords
- Use Rich Pins
- Follow other Pinterest bloggers in your niche
- Include repins
- Automate your account
- Be consistent
To drive traffic from Pinterest to your blog, start with a business account. Pinterest requires this if you’re promoting a brand. Business accounts have access to analytics, too, like how many people click through to your blog. Next, create your first boards and pins. If you’re unsure what to make, focus on your blog’s main topics. Don’t forget to use relevant keywords and Rich Pins so the right people find your content and click on it.
Follow other Pinterest bloggers to see what they’re doing. Also, try to automate your Pinterest as much as possible, so you can focus on your blog. Use a tool like Tailwind to schedule pins ahead of time. Finally, keep pinning consistently to get fast traffic to your blog.
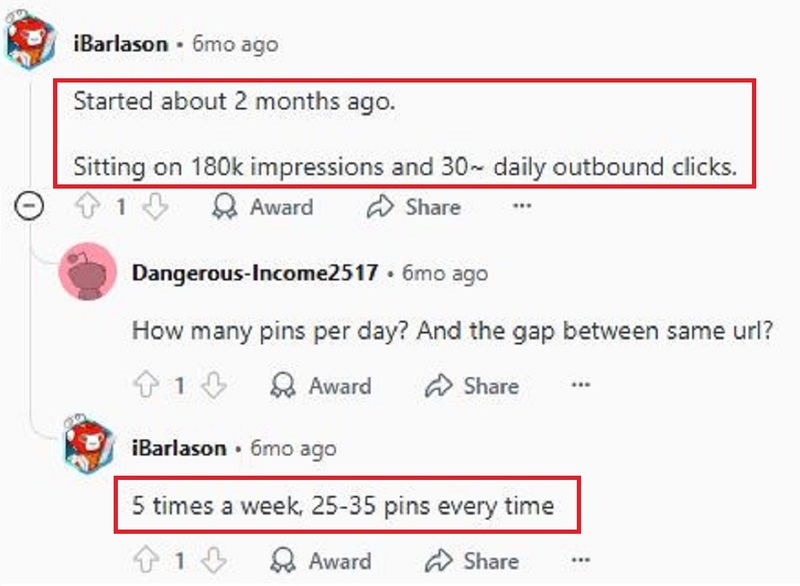
Pinterest users are highly engaged. According to Google AI, Pinterest’s outbound click-through rate is 0.2 to 0.5%. For every 1,000 people that view your pin, expect around 2 to 5 to click to your blog. One Reddit user says they started using Pinterest 2 months ago to boost their blog traffic. They got 180K Pinterest impressions on their pins and 30 daily clicks to their blog. For this, they pin around 25 to 35 pins 5 times a week.
As someone who’s been blogging for almost 11 years now, I’ve tried many strategies to grow my audience. I found that Pinterest brings in fast results, but SEO is more reliable in the long run. But if you’re new or struggling, Pinterest is a good start. Here, I give you the 9 steps on how to use Pinterest for blogging. I go over all the details, tips I’ve learned along the way, and expert advice. I also talk more about the effectiveness of Pinterest and blogs.
Step 1: Create a Pinterest Business Account
To create a Pinterest business account:
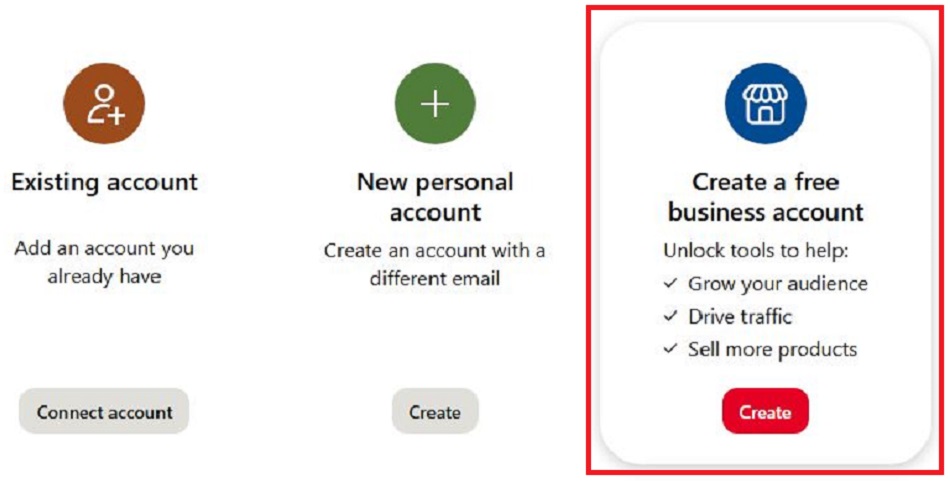
- Sign up for a business account. Head over to Pinterest, click sign up, and scroll down to ‘create a free business account’. Enter your email, password, and birthdate.
- Fill out your information. For bloggers, choose ‘Content Creation,’ then enter business name, country/region, and website URL. Next, select your blog’s goals and focus.
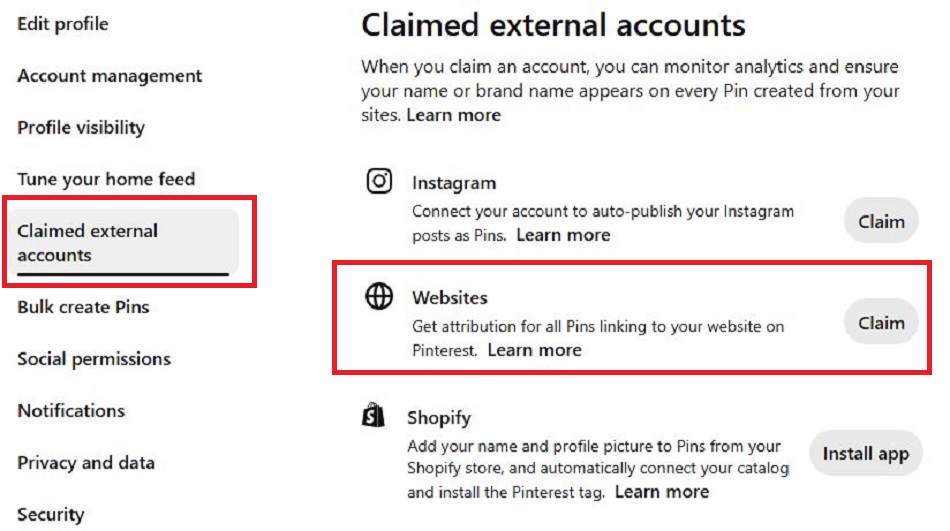
- Claim your website to link it to your Pinterest account. On the top right corner, click your profile > edit profile > claimed external accounts. Choose to claim your website and select ‘Add HTML Tag’. Pinterest will give you a meta tag that you need to copy and add to your website.
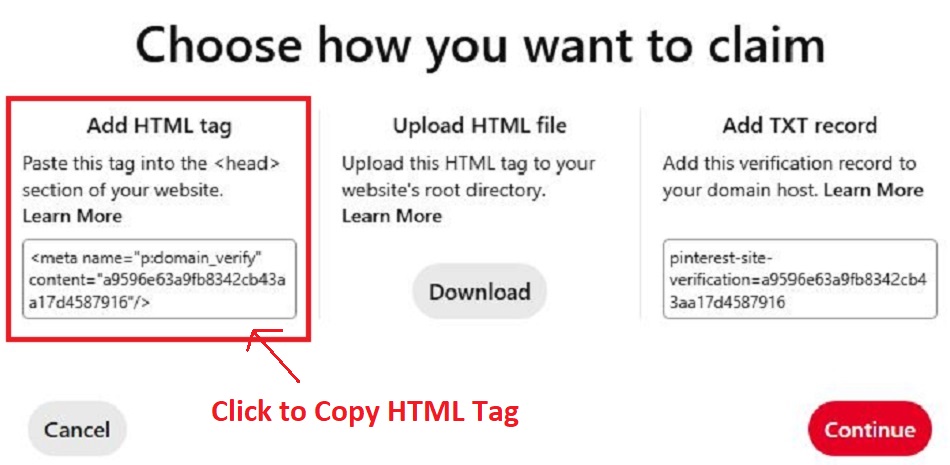
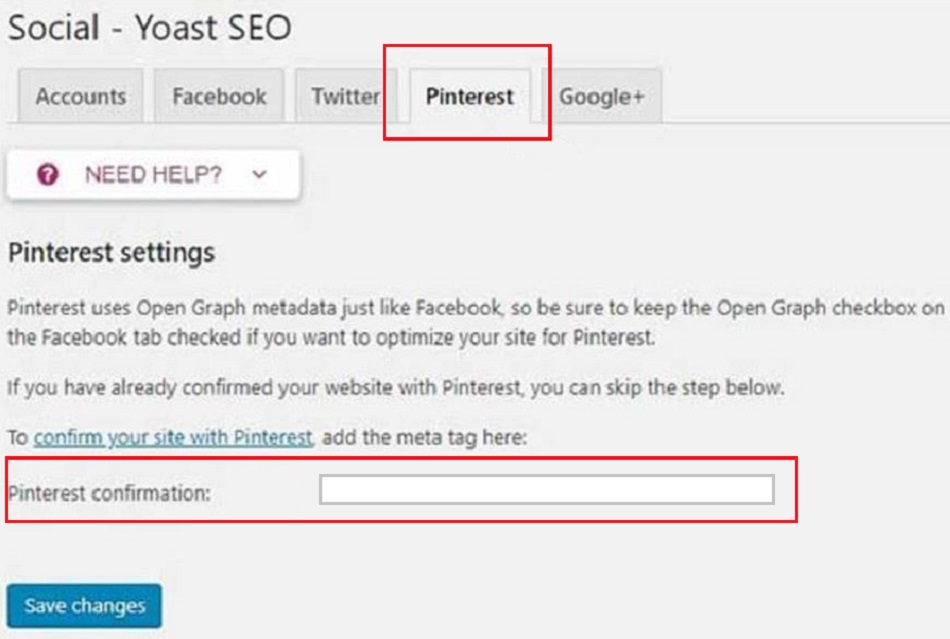
- Add the meta tag to your website. If you’re using WordPress, add the code to your site’s header. If you don’t want to do any coding, get a plugin like Yoast SEO to easily add the tag that Pinterest gave you. Go to Yoast SEO > Social > Pinterest > paste the provided tag > save.
- Verify your website for review. Go back to your Pinterest tab, click ‘Continue’, then add your website URL with the tag or file and ‘Verify’. Wait 24 hours for an email confirmation from Pinterest. Or, go back to the ‘claimed external accounts’ section and see if Pinterest has a green check mark.
- Complete your profile. Go back to your profile icon > edit profile. Upload a clear, camera-facing, smiley photo of yourself. Fill in all the other information, like your story, username, email, and location. To improve your profile, add a header image that shows your brand or some of your pins. TIP! For your about section, explain what your blog is about, who it’s for, and the main problems you solve. This attracts followers.
A good rule of thumb is to keep your Pinterest account consistent with your blog. For example, your business name and username should be the same as your blog. Since my blog is my name, Ippei, I use that throughout. Your profile picture should also match the image of yourself on your blog or at least on your social media. This way, it’s easier for people to recognize you.
If you already have a personal Pinterest account, you can turn it into a business one. However, Gab Gargano, an expert Pinterest blogger, doesn’t recommend this, especially if your account was only used for personal stuff. Even if you already have followers and want to take advantage of that, they might not care about your blog pins. But to her, the main reason is that you’ll have to spend a lot of time cleaning your account. That means removing or hiding your personal pins and repins. It’s much easier to just make a new business account.
Step 2: Make Your First Pinterest Boards
To make your first Pinterest boards:
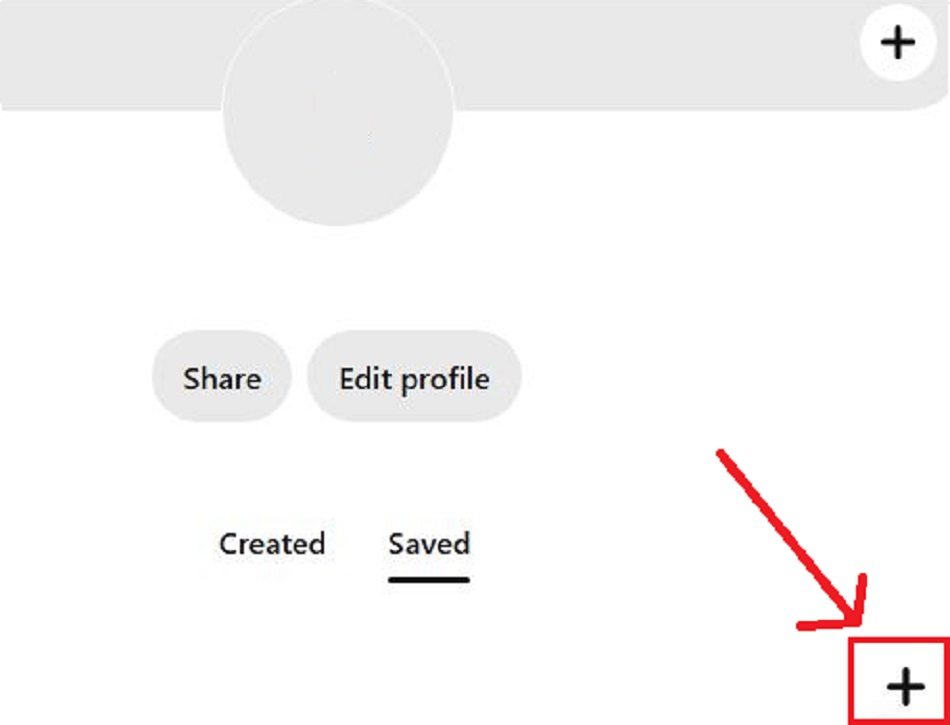
- Go to your profile icon in the top right corner. Once there, click the “+” button below ‘Created’ and ‘Saved’.
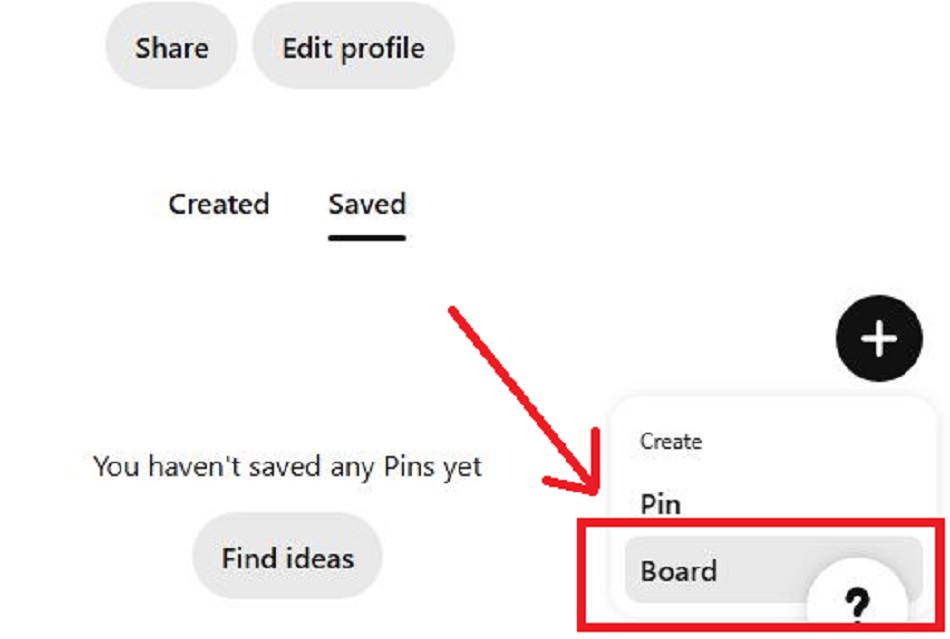
- Choose ‘Board’ and give it a name, like “Best of [Blog Name]”. TIP! The board that appears first on your profile should only include pins from your blog. Pinterest removed the featured boards option, so you’ll need to move it to the top whenever you create a new board.
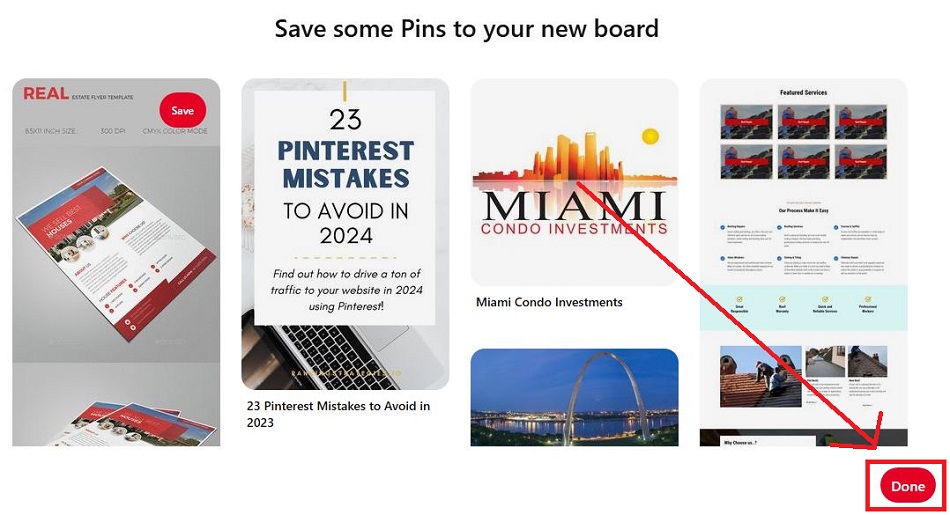
- Click ‘Create’ and then ‘Done’. Pinterest might ask you to save some pins, but skip that for now. TIP! Only add other people’s pins when you make other boards, not your main Pinterest blog board.
- Go back to your profile, select ‘Saved’, and click the pencil icon on your board to edit it. Input the board image, name, and description.
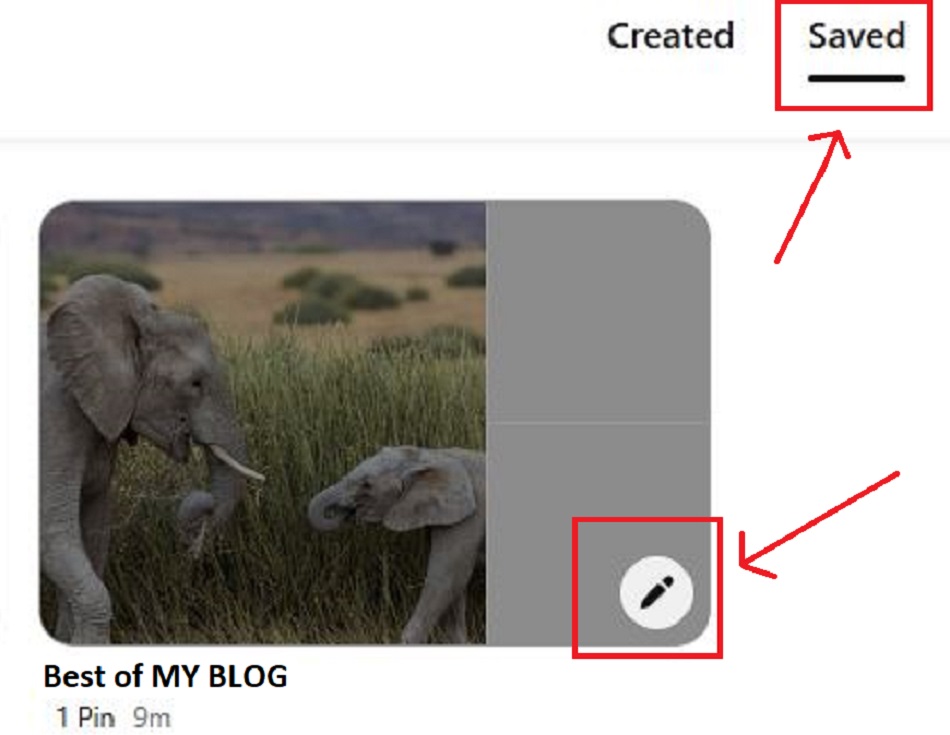
When you’re done with your blog board, make other boards with broader, evergreen topics. For example, if your blog is about healthy eating, make boards like ‘Easy Healthy Dinners’, ‘Meal Prep Ideas’, or ‘Healthy Snacks’. Here, add 10 to 20 helpful pins from other people that match the topic. This fills your boards, boosts engagement, and shows Pinterest you’re not just promoting yourself.
A Pinterest board is a place to save and organize pins on a specific topic. Boards also let Pinterest understand what your pins are about. This way, your pins show up to people searching for similar topics. That’s why it’s important to use keywords in your board titles and descriptions (more on that later).
Step 3: Design Your Blog Pins and Upload Them to Pinterest
To design your blog pins:
- Choose a design tool, like Canva, Tailwind Create, or Adobe Express. Canva is the most popular one as it’s free, easy to use, and comes with many Pinterest templates. Tailwind Create is specifically for Pinterest pins. It allows you to create 5 free pins monthly or spend $14.99/month for 200 pins. Adobe Express offers more advanced pin design features for $9.99/month.
- Set the pin size to Pinterest-recommended dimensions - vertical 2:3 ratio. This translates to 1,000 pixels wide by 1,500 pixels tall. With this, you’re sure your designs don’t get cut off. TIP! You can try a smaller size too, like 600 x 900 pixels, to see which ones get the most clicks.
- Pick a pin template (optional). This makes it easy if you’re not sure how to design your pins. Just change the text, add your blog title, a short description, and an image. Here are some pin templates from Canva:
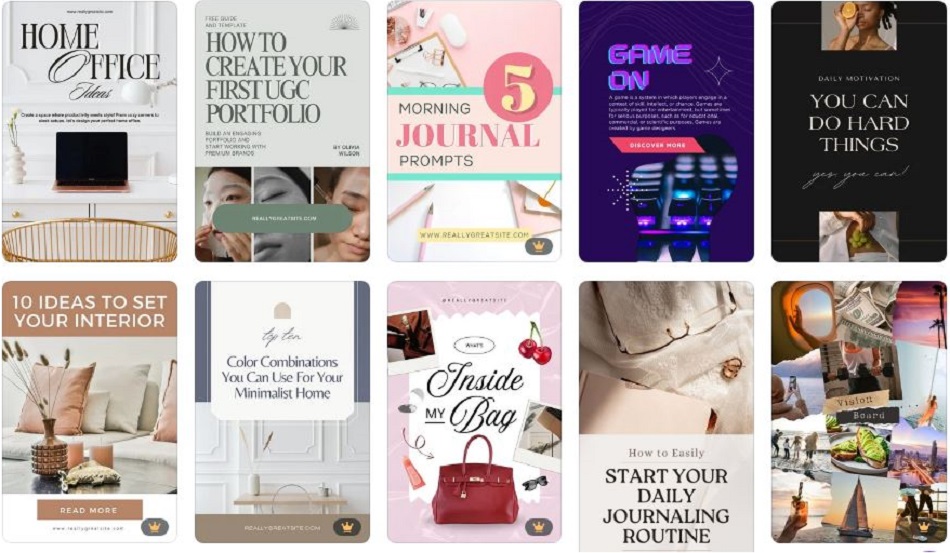
- Add a short, bold, and clear blog title. This is what draws people’s attention first, so use words that make them want to click. TIP! If your topic is visual, like office decor, you don’t have to put a title. Instead, use a great-looking image that people will want to save for inspiration.
- Use eye-catching images so people notice them in the search results. Use Pexels, Pixabay, or Canva for free photos and videos, illustrations, and graphics. Of course, use your own images if you have them. All photos should be closely related to the topic.
- Include your logo or blog name. Keep brand colors and fonts consistent, too, so you’ll be easy to recognize.
- Add a call-to-action, like ‘See the Full Guide" or “Learn More”. A CTA tells people what to do next. It’s what turns views into clicks and brings more traffic to your blog. You can place the CTA on the image itself or in the pin description - both work well.
- Double check your work. Check for wrong grammar and spelling mistakes. See if the text stands out from the background. Make sure fonts are clear and easy to read on mobile. Test if the image looks good in Pinterest’s preview.
- Download your pin. Save it as a high-quality PNG or JPG.
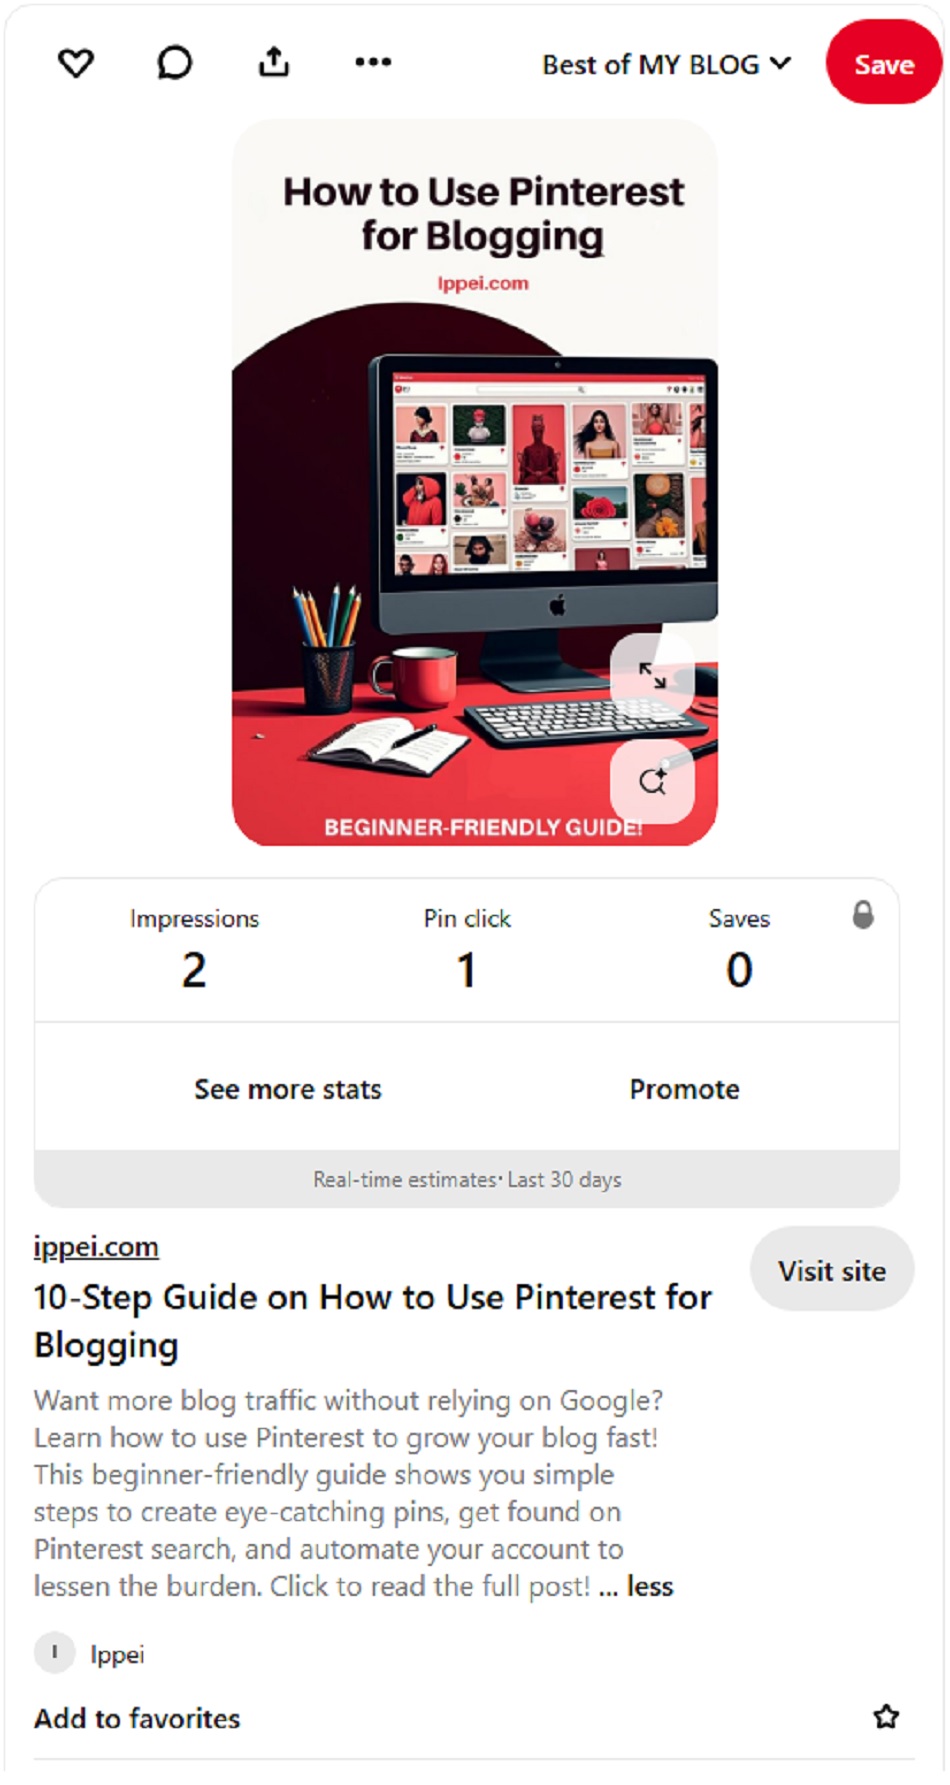
Here’s a pin design I created for this blog. I used big, bold letters for the blog title to grab people’s attention. I also added my blog name and a ‘beginner-friendly guide’ at the bottom to get more people interested. The image shows a desk setup that a blogger might have, with Pinterest on the screen. Finally, I made sure to use my main colors, black and red. This is a super simple design that works.
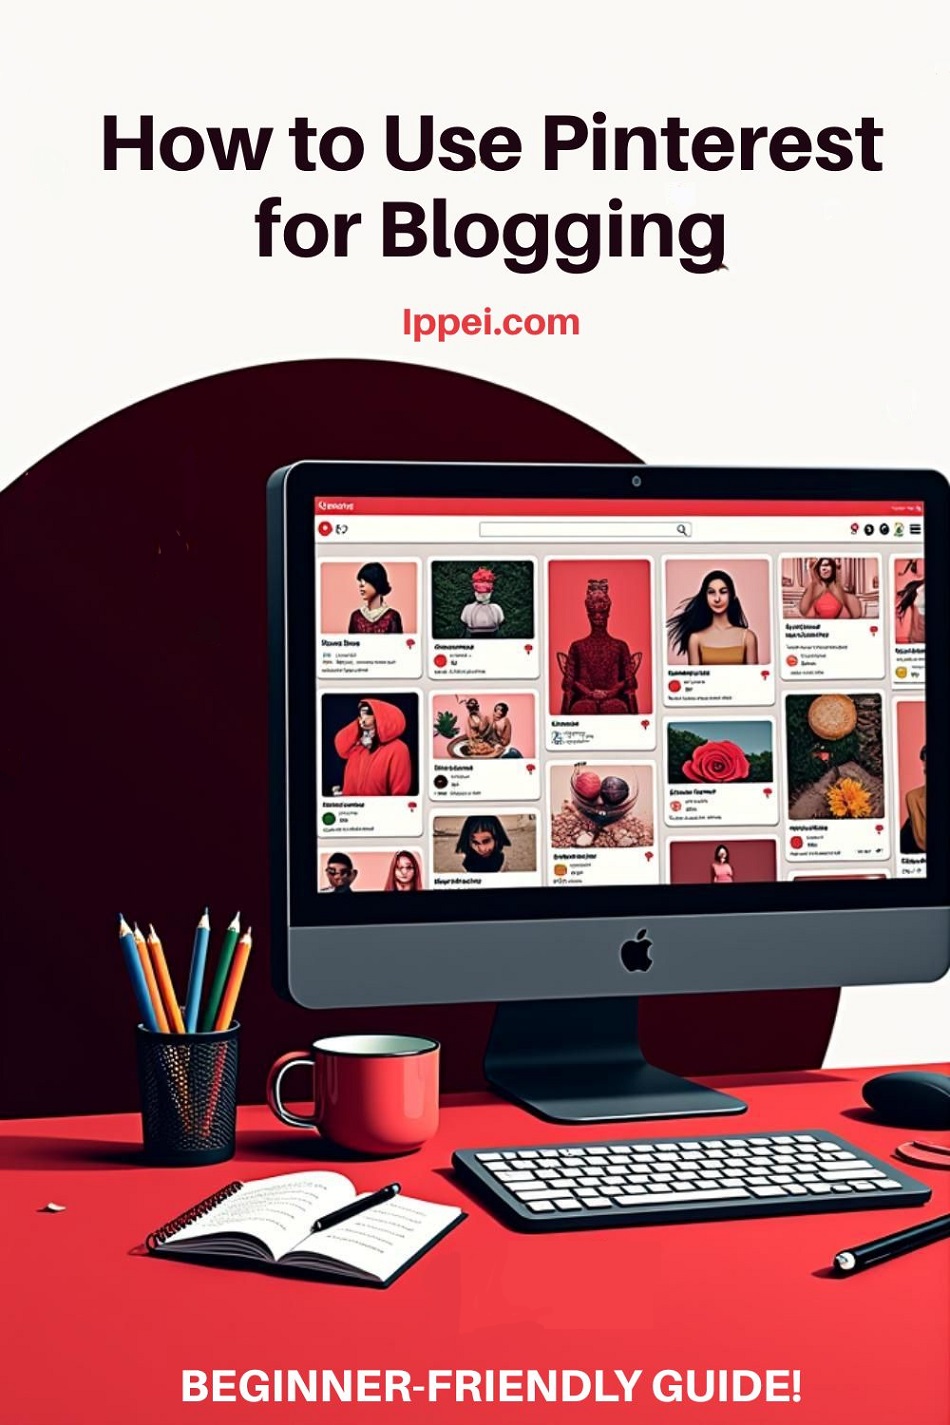
To upload your designs to Pinterest:
- Head over to your account. Click your profile icon > Saved > “+” > Pin.
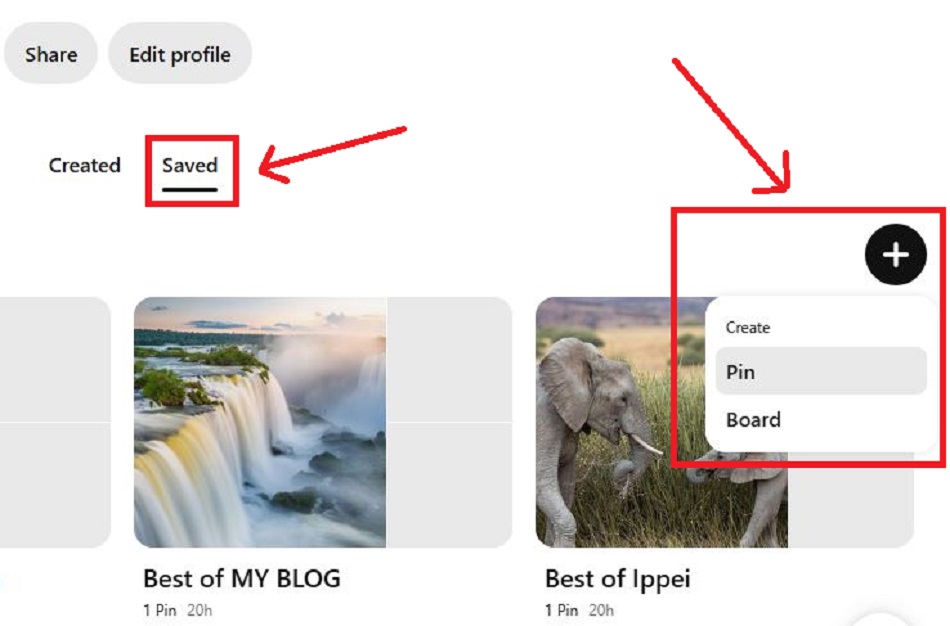
- Upload your design and fill out the information. The description is the one that appears below the pin. Write something compelling that makes people want to click and read your entire blog. Make sure to add relevant keywords so your audience finds you.
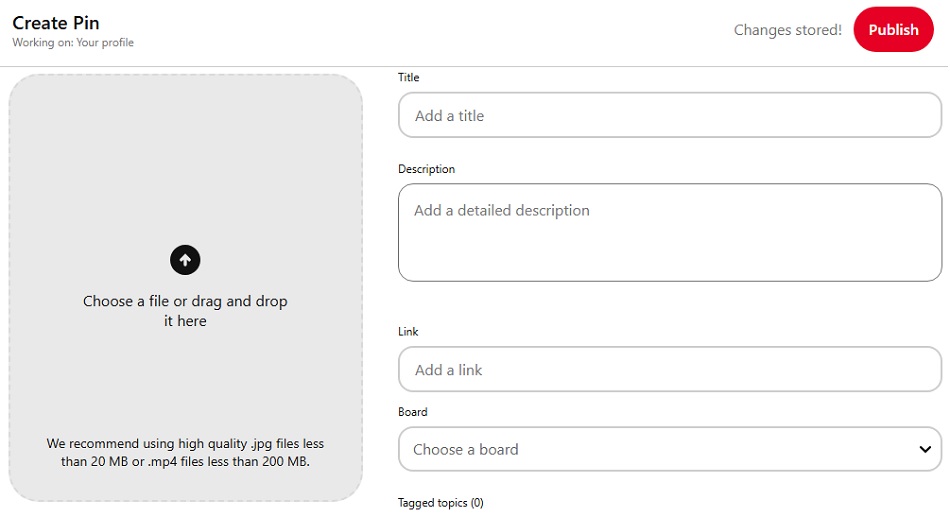
- Hit publish! Your pin will then go live. Below the pin, you’ll see your impressions (how many times people saw it), clicks, and saves. TIP! Post at least 5 different pins for one blog post.
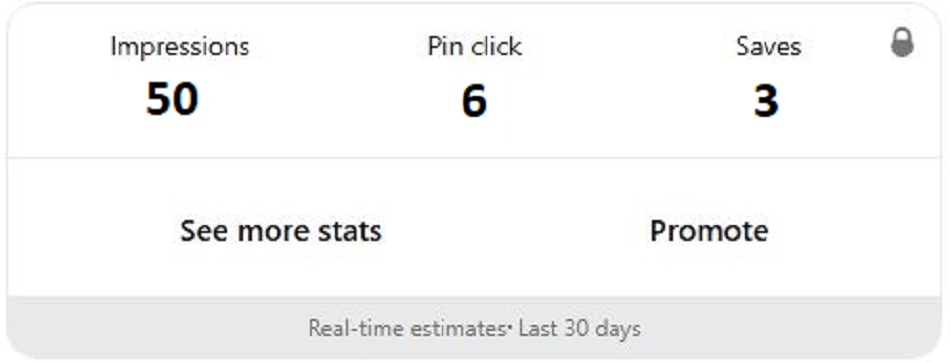
Here’s what a fully published Pinterest pin will look like:
Rebecca MacFarlane suggests Pin videos. This is one way to stand out as videos play automatically when they show up on feeds. She also says that Pinterest favors videos over static images. However, Rebecca warns that videos are hit and miss, depending on your blog niche. To avoid wasting time, upload a few of your TikTok or Instagram videos to Pinterest and see if it’s effective. The video file type is .MP4, .MOV, or .M4V. Video length is from 6 seconds to 15 minutes. The width should be shorter than a 1:2 ratio, but taller than 1.91:1.

Step 4: Add Relevant Keywords to Your Pinterest Boards and Pins
To add relevant keywords to your Pinterest boards and pins:
- Get PinClicks - a Pinterest keyword research and analytics tool. It shows what keywords and trends people search for on Pinterest. Find the popular ones in your niche and add them to your titles and descriptions. However, this tool costs $29/month or $49/month.
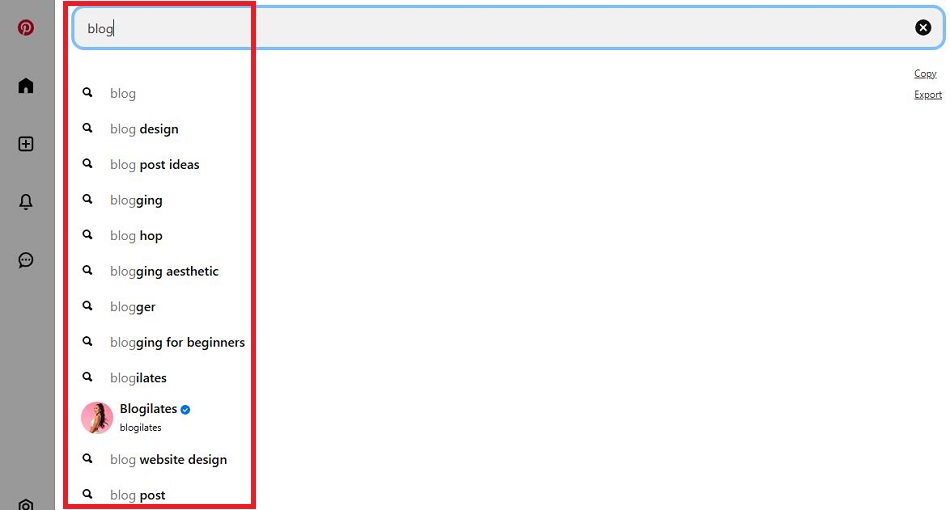
- Follow Pinterest’s auto-suggest feature. When you type something on Pinterest’s search engine, it gives you several suggestions. For example, if you put ‘blog’ in the search bar, common ideas, keywords, and even people pop up. Use those as your keywords.
- See what keywords your competitors use. Type your niche in the Pinterest search bar, and click on the pins with the most repins, saves, or likes. Look at their titles, descriptions, and hashtags to get ideas for your own content.
- Use keyword tools like Ahrefs or Google Keyword Planner. This is best if you already use one for your blog. Although Pinterest is different from Google, these tools still give you great keyword ideas. You’ll see what your target audience searches for - and how often.
- Place keywords naturally in your pin and board titles and descriptions. Don’t stuff in too many - it makes your content hard to read. Instead, make sure everything flows nicely and makes sense.
- Update your existing boards and pins with relevant keywords. If you’ve already published a board or pin, go back and add the keywords you found. To do that, hover your mouse over the pin or board and click the pencil icon to edit it.
Pinterest is a search engine, like Google. You need the platform to understand your content and show it to the right people. Too many bloggers don’t realize this, so they create vague titles like ‘Yum’ instead of ‘Easy Dinner Recipes.’ And don’t feel like that’s too generic, because that’s exactly what people are searching for.
Step 5: Use Rich Pins to Display More Blog Information
To use Rich Pins:
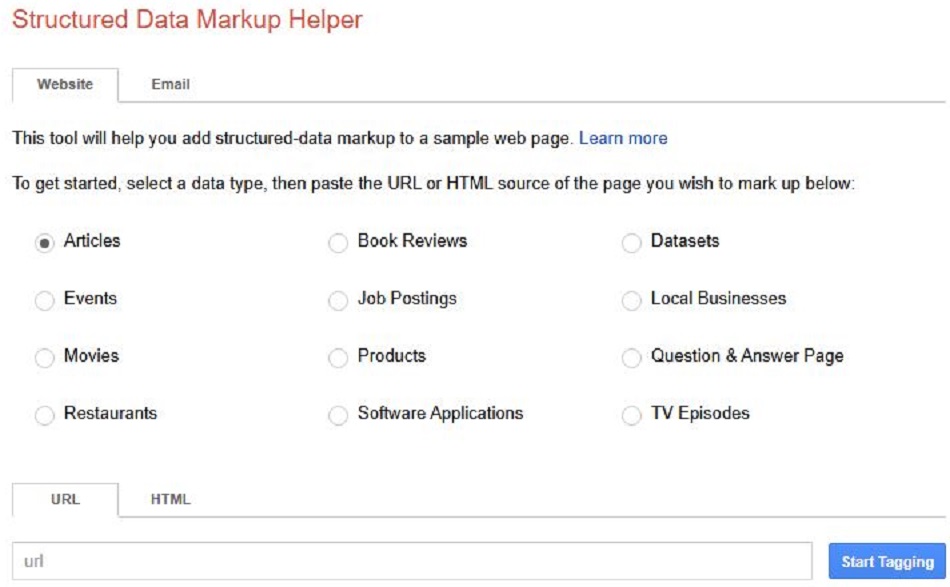
- Head to Google’s Structured Data Markup Helper and choose “Article” as your content type. Enter the URL of the blog you want to add structured metadata to and click “Start Tagging.” TIP! If you use WordPress, install a plugin like Yoast SEO or Rank Math to skip these steps.
- Highlight the blog title, author, date, image, and article body. What you select will appear on your Rich Pins.
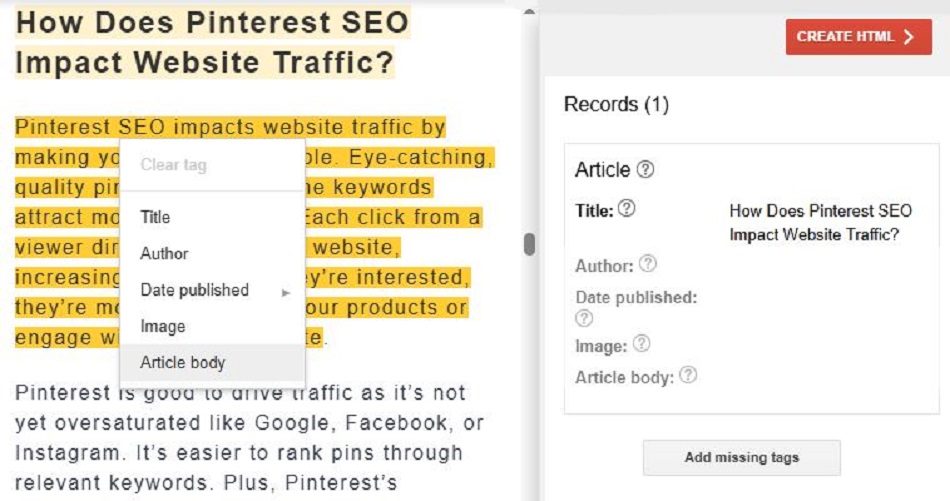
- Click “Create HTML” and copy the code provided.
- Add the code to your blog’s HTML. If you don’t know how to do this, ask your web developer, watch YouTube videos, or use a plugin like WPCode. It lets you easily add code to your site’s header without editing theme files.
- Create new pins for blog posts with structured metadata. Pinterest automatically enables Rich Pins - you don’t need to validate it anymore. With this, your pins will display more information about the blog to encourage clicks. TIP! There’s no need to do anything extra after setup. Once active, Rich Pins update themselves if you change the info on your blog post.
There are 3 types of Rich Pins:
- Article Pins show your blog title, author, and a short description.
- Product Pins show the price, stock info, and where to buy.
- Recipe Pins show ingredients, cook time, and servings.
Most bloggers use Article Pins. But if you write about products or recipes, choose the right type in Google’s Structured Data Markup Helper so the correct info shows on your pin. Rich Pins stand out as it shows a preview of your blog without needing to click on it. This piques people’s interest more, so they visit your site. Since it grabs attention, it’s an important step driving fast traffic to your blogs.
For best results, use Rich Pins for detailed topics and regular pins for image-focused ones. For example, ‘How to Start a Garden in Small Spaces’ should show a short description so people know what to expect. But a topic like ‘20 Garden Ideas You’ll Love’ only needs a good image to get clicks.
Step 6: Follow Other Pinterest Bloggers in Your Niche
To follow other Pinterest bloggers:
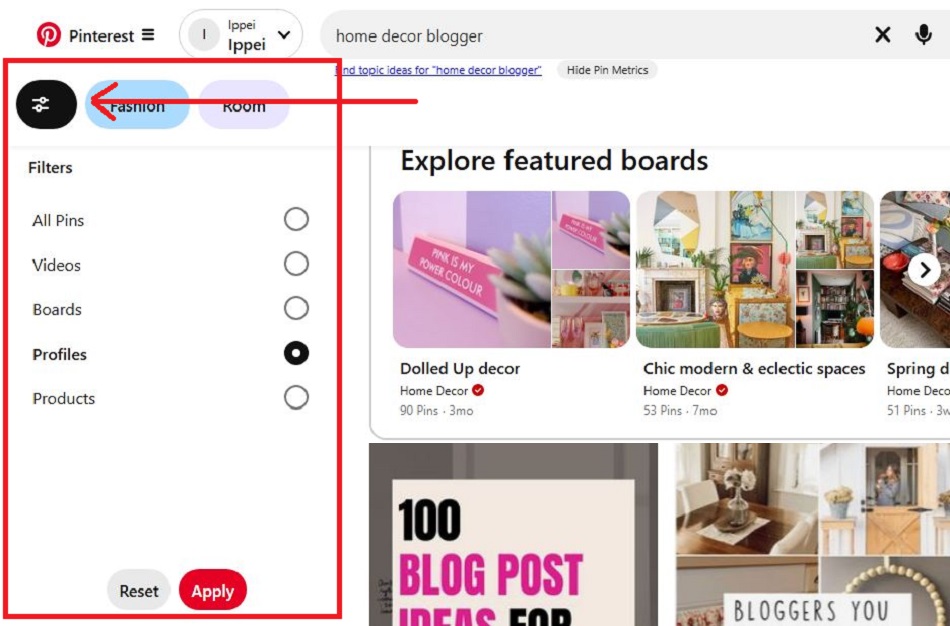
- Click on the Pinterest search bar and enter a name/username, blog name, keyword + “blogger”, or a niche topic. For example, search for ‘home decor bloggers’ and look through the auto-suggest feature.
- Filter your search to ‘profiles’ only. If you want more suggestions, select the icon in the top left corner. Then, filter your search to ‘Profiles’ and ‘Apply’. Instead of pins or boards, this will show you all the profiles that match your search query.
- Browse profiles and follow. Go to the profiles you’re interested in. Check their pins, boards, and engagement. If you like what you see, click the red ‘Follow’ button below their profile picture.
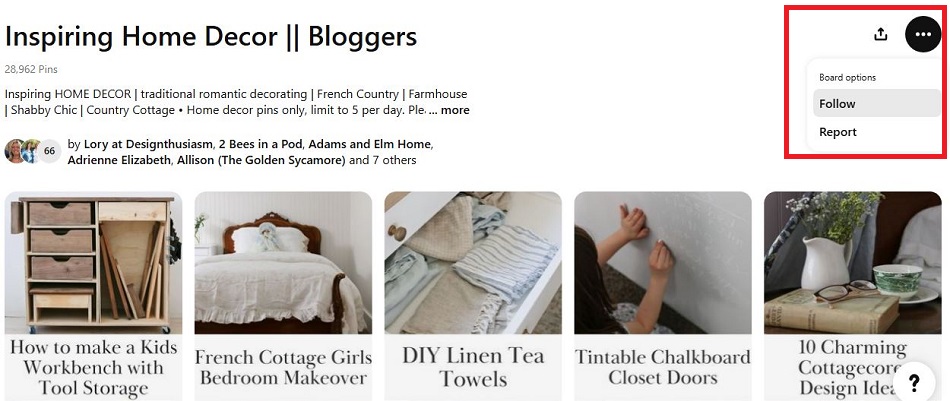
- Follow specific boards. If you’re only interested in one topic, follow its boards instead of the whole profile. Simply go to the board, press the three dots on the right side, and hit ‘Follow’.
- Watch out for eye-catching pins. Even if you’re not looking for profiles to follow, you might find one if a pin stands out. Click it, go to the creator’s profile, look at their other pins and boards, and follow them.
- Check if bloggers you follow have Pinterest. Scan their website or social media and look for a Pinterest link or icon. Or, type their blog name in the Pinterest search bar.
Following other bloggers on Pinterest gives you new ideas without researching. You’ll see what types of pins work for certain topics. You can check which ones get the most saves and reactions. It helps you spot trends that top creators in your niche are using. It also encourages bloggers to follow and engage with your pins, boosting visibility.
Step 7: Include Repins on Your Pinterest Boards
To include repins on your Pinterest board:
- Find quality pins from other people. Make sure it matches your blog niche, fits your board name, and is interesting to the people you want to reach. Repins should only be when you find an exceptional pin your followers need to see.
- Save the pin you want to share. First, click on the pin to see more details. Then, select the dropdown menu at the top and choose which board you want to add it to. Press the red “Save” button in the top right corner. TIP! Use general boards for repins, not boards dedicated to your own blog content.
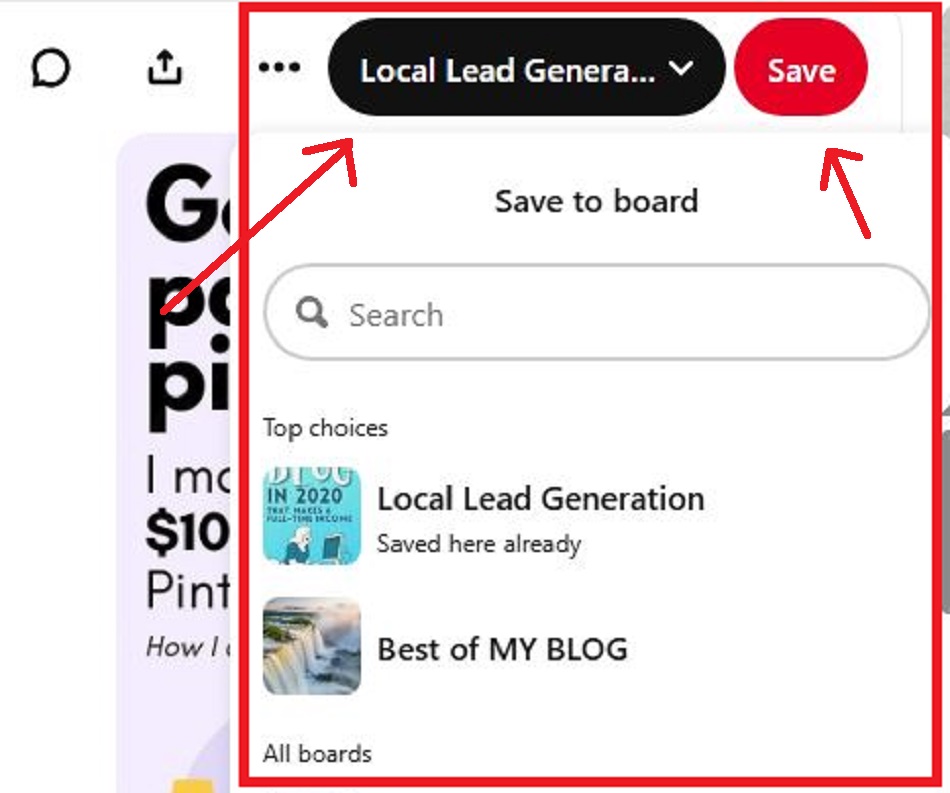
- Track how well your repinned content is performing. This lets you see what your audience enjoys so you can create pins that work.
- Use repins to fill the gaps. If your board is new, add a few different repins to fill it up while you make your own pins.
- Engage with repinned content. If someone comments on a pin you saved from someone else, feel free to reply. Being active builds trust and boosts your Pinterest visibility.
Be known for posting good and helpful pins. When people see you’re sharing useful content, they’ll trust you, follow you, and even visit your blog. More blog visitors mean more chances to earn money.
However, repins aren’t as effective in 2025 as they used to be. So don’t put too much time into this. It’s just a good way to fill up your boards and provide genuine help to others. A good ratio will be 90/10 or even 95/5. This means 90% or 95% of your pins should be your own, and 10% or 5% should be repins. This way, more people are directed to your blog instead of someone else’s. Plus, Pinterest now values people who create their own pins.
Step 8: Automate Your Pinterest Account to Focus On Your Blog
To automate your Pinterest account:
- Schedule pins with Tailwind. This allows you to plan and automate your pins ahead of time. It includes Tailwind Create for quick pin designs and SmartLoop to repost evergreen content. Create and schedule all your pins in one day and let Tailwind post them for you, saving hours each week. Tailwind’s paid plan starts at $14.99/month, but it also has a free but limited plan.
- Design pins with Canva. There are lots of eye-catching pin templates here. Just swap the text and image to create pins faster. If you get the paid version ($15/mo), you can even publish directly to Pinterest without leaving Canva.
- Use a drag-and-drop scheduler with Later. If you’re a visual planner, Later provides a calendar to plan out your posts. It also automates Pinterest content by publishing it for you on those dates. You get these features on the free plan.
- Organize and recycle content with SocialBee. Sort your pins by category, like how-tos, tips, or promotions. It also reposts your evergreen pins. Your best blog content gets shared again and again without extra effort. SocialBee has a 14-day free trial and costs $29/month after that.
- Plan content across platforms with Buffer. This is great if you’re working on other social media strategies. It lets you schedule Pinterest pins along with posts for Facebook and Instagram in one place. It’s easy to keep your blog promotion consistent across social media. It’s free, but if you want more posts, you’ll have to pay $5/month.
- Track and optimize your Pinterest strategy with Hootsuite. This offers powerful analytics that show how your pins are doing. See which ones get the most clicks, saves, and engagement, then use that data to schedule more of what works. Hootsuite drives more consistent traffic to your blog. However, it costs $99/month.
You need to post a lot of fresh pins to drive fast traffic to your blog. But you don’t want pinning to take time away from writing blog posts. Automation lets you stay active on Pinterest while focusing on your blog.
Step 9: Stay Consistent to Boost Pinterest Visibility
To stay consistent, post 3 to 5 new pins each day during busy times and 1 to 3 pins in off seasons. Pinterest prioritizes fresh content, which means new images or designs. Regular posting increases your chances of reaching more viewers and blog visitors. You also need high engagement, so focus on quality over quantity. Make pins that people want to save, react to, and click.
Once you get the hang of it, increase your daily pinning. Here’s what some popular Pinterest bloggers do:
- Anastasia Blogger pins 30 times a day using automation.
- Katie Grazer posts 15 to 25 pins a day while following Pinterest’s rules.
- Angela from StrayCurls.com creates 2 to 3 new pins daily and uses automation if she wants to share more.
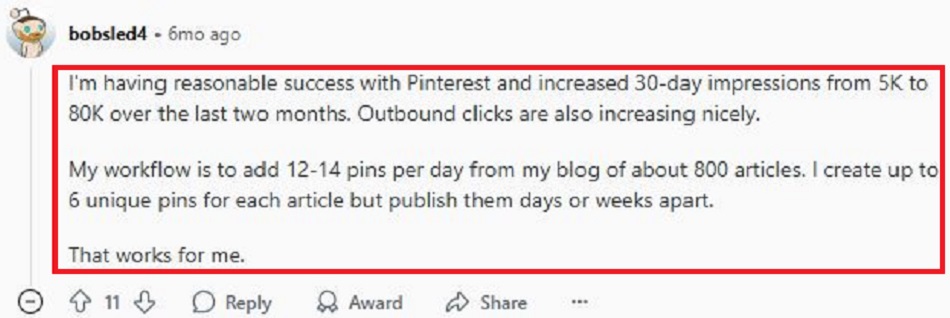
One Reddit user says they post 12 to 14 fresh pins a day. For each blog, they create 6 different designs and publish them weeks apart. With this strategy, his Pinterest impressions jumped from 5K to 80K in just 2 months. He also claims that outbound clicks to his blog are growing fast. All this shows that the more quality pins you share, the more visibility and blog traffic you get.
Is Pinterest Good for Blogging?
Pinterest is good for blogging as its highly engaged users drive fast traffic to your site. Pinterest reports that 85% of its millions of active users use the platform to start a new project. This makes them more likely to click through to your blog for help. More traffic grows your blog’s popularity and earns more income.
The best part is that pin visibility doesn’t rely on followers. If you’re new, you can get thousands of views through keywords and design alone in a few months. Pinterest also works more like a search engine than a social media app. This means your pins keep showing up in searches for months or even years. That’s a big opportunity to get your blog in front of people who are actively searching for content like yours. However, you need to know how to use Pinterest for blogging for it to work effectively.
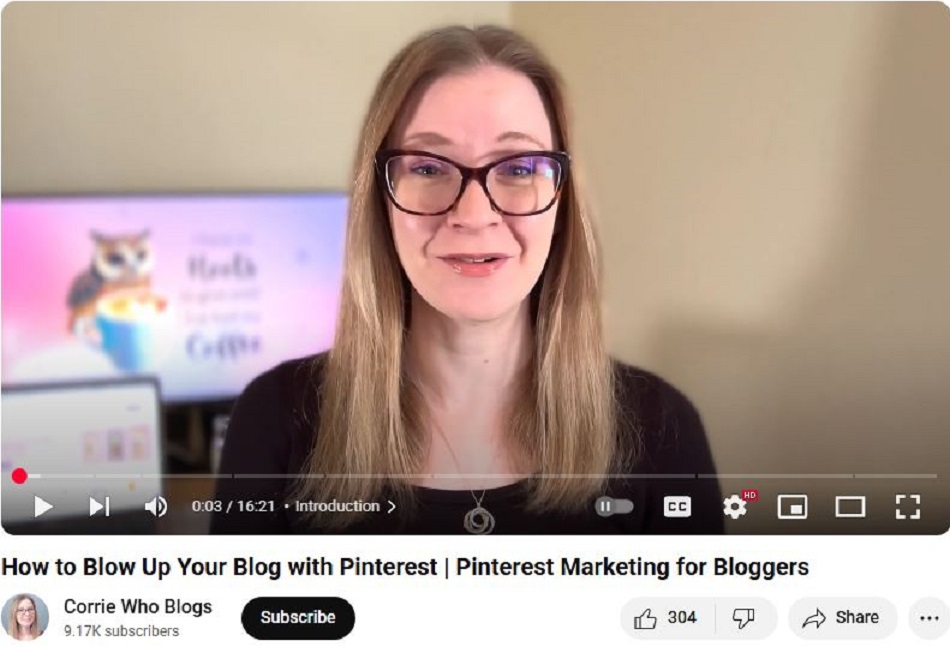
Corrie Who Blogs says Pinterest is what got her up and running. When she started blogging in 2018, it took a long time to get traffic. This made her discouraged until she discovered Pinterest as a strong traffic source. For the first two years, Pinterest provided more than half of her total website traffic. Even now that she’s doing well, Pinterest still brings in 25% of her blog visitors.
Do People Still Read Blogs in 2025?
People still read blogs in 2025 as they offer useful info, teach new skills, share news, and tell real stories. According to HubSpot, 60% of all internet users actively read blogs. Ahrefs reports that 77% read blogs daily, meaning there are billions of blogs read every day. Even with videos, social media, and AI chatbots, blogs give deep insights that people want.
If you’re starting a new blog, don’t worry too much about it. If it’s helpful or fun, people will want to read it. The hard part is getting people to find your blog. This is where Pinterest helps. It’s a great way to show your content to many people without competing with bigger companies or other media.
Conclusion: Can Pinterest Bloggers Make More Money with Local Lead Generation?
Pinterest bloggers make money through:
- Affiliate marketing.
- Sponsored posts and brand deals.
- Selling their own products or courses.
- Displaying ads.
- Promoting services like coaching or consulting.
These strategies bring in good money, but they all rely on your readers taking action. Pinterest brings fast traffic, but your blog still needs to convince people to click, buy, or sign up before you earn anything.
That’s why I prefer to earn through local lead generation. Instead of just Pinterest blogging, I build websites for home service businesses. I write local content to get those sites up on Google. Once a site starts getting traffic and leads, I rent it out to an actual company in the area.
I show the business how many people are visiting the site and how many leads it’s generating. If they’re interested, I add their name, address, and services to the site. These businesses often pay $500 to $3,000 a month because the leads are valuable.
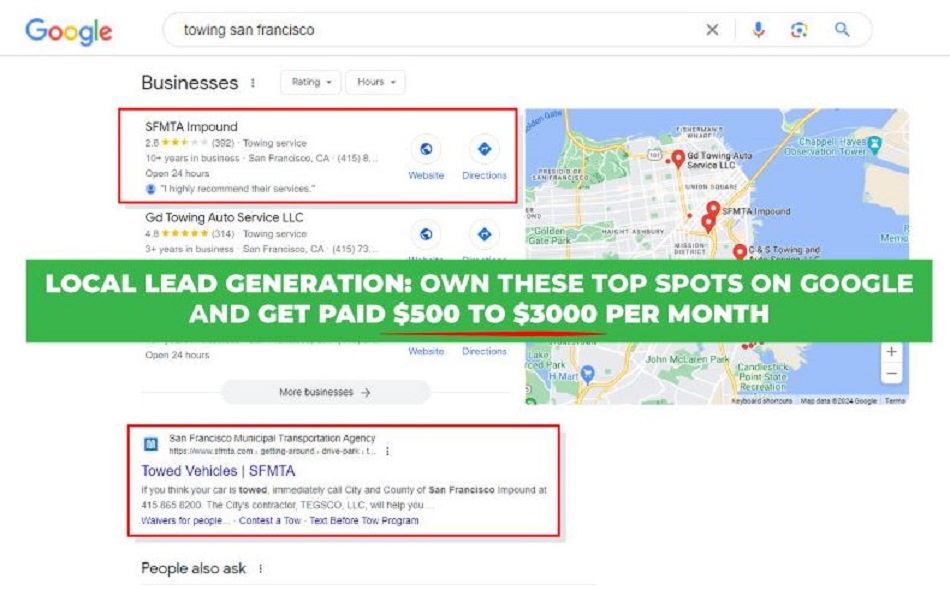
I now make around $50,000 a month from this strategy. Although I focus on local SEO to drive traffic, you should start with Pinterest. Get as many people to your local lead gen websites so you can start renting them out.

Follow Me
Ippei Kanehara
Founder/CEO
$52K per month providing lead generation services to small businesses
Ippei.com is for digital hustlers, industry leaders and online business owners.
His #1 online business recommendation in 2024, is to build your own lead generation business.
